Introduction:
The data collected by a UAS goes well beyond a pretty picture of what your house looks like from above. If gathered correctly, with the right sensor for the right job, your UAS data is a bountiful harvest waiting for you to exploit the value. This lab goes through the steps of classifying an aerial image for different surface types using ArcGIS Pro. The instructions for this lab were provided by ESRI Tutorial "Segment the Imagery"
Process:
The tutorial began with downloading the data and starting the ArcGIS Pro project file. The first step was to create a new layer by extracting bands 4, 1, and 3 from the imagery. This created a false red image that shows vegitation as red and manmade objects like roads as grey. This allows for easier classification later. The next step was to classify different segments of the image into groups based on spectral characteristics. To do this a Segment Mean Shift raster function was used. This new layer was saved as Lousiville_Segmented. The next step of this process is to classify the different groups by specifying spectral signatures. This is done with the image classification toolbar in ArcMap. The user selects spectral signatures by drawing shapes in that signature then grouping like groupings together. Then back in ArcGIS Pro, the groupings just created are imported into the classifier. A few classifier tools are ran until a tif is created with all impervious and pervious objects on the image seperated into two separate classes. The next step is to determine if the new image accurately categorized objects into the proper classes, impervious or pervious. The first step in this process is to create points then opening their attribute table and manually checking to make sure they were categorized correctly. If they are not the user must make the appropriate adjustments. Then a confusion matrix was created to see the accuracy of the points added. This resulted in a 92% overall confidence. This allows the user to proceed in confidence. The next step was creating a graduated colors map to symbolize the areas with a high amount of impervious surface. This was done by using a series of tools provided in the tutorial.
Final Map:
The Parcels with the highest area of impervious surfaces appear to be the ones that correspond to the location of the roads. These parcels are large and are almost completely impervious. The parcels with houses on are often an orange color due to the impervious surface like the house and the driveway mixed with an area of pervious surface like grass or ground.
Conclusions:
ArcGIS Pro makes data processing and analysis very streamlined. It lays the process out for doing a task in a manner most people can easily understand. The process for creating a map of impervious surfaces in the Louisville area was a simple procedure that resulted in a high quality map that could be useful in many situations. The application of ArcGIS Pro with UAS Data is growing everyday. It is growing increasingly easier to use UAS data in many everyday mapping platforms.
Monday, March 6, 2017
Building Maps with Pix4d
Overview of Pix4d:
Pix4d is an image processing software that is based on automatically finding thousands of common points between images. When the same common points (keypoints) are found on multiple images the, program generates a 3D point. In order to create highly accurate 3D images, images must maintain high amounts of overlap to create as many 3D points as possible. It is recommended by Pix4d that at least 75% frontal and 60% side overlap is maintained.
Maps/Data:
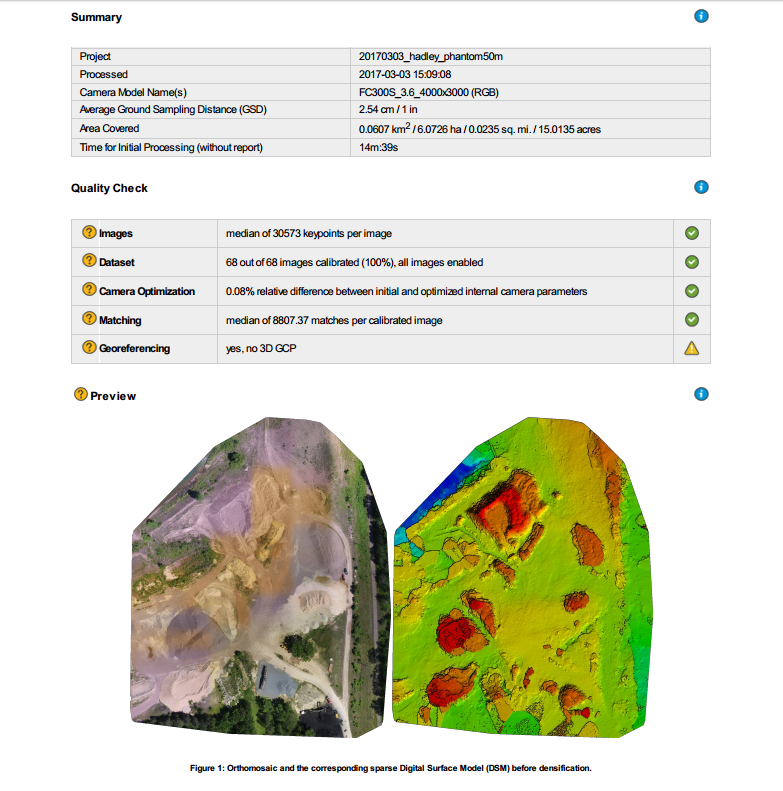
After the processing, Pix4d creates a report with lots of useful information. The first page of the quality reports shows a summary, quality check of processing results, and a preview of the maps that are created.
In the report is a section about overlap. It is important that the images contained a high amount of overlap to create as many keypoints as possible. This will ensure the highest quality 3d image. It can be seen that the bottom row of images have less overlap than anywhere else. This could be due to a gust of wind pushing the UAS slightly off its path during the last sweep.
The .tif files created in Pix4d can be imported into a geodatabase in ArcMap and created into visually appealing maps. The map below is a Digital Surface model and a Mosaicked image of the mine the data was taken from. The map on the left shows the height of different objects in a color scale model and the map on the right shows the visable band image of the area.
A useful tool in Pix4d is creating videos of maps using the in software fly over video recording tool. This allows the user to create visually appealing flyover videos of the area by simply setting way points and rendering the video.
First Impressions of Pix4d:
At first impression this software is easy to use and can be very beneficial for many applications in the UAS world. Taking drone imagery then turning it into a georeferenced 3D map without Pix4d would require extensive knowledge of different programs and algorithms. Pix4d allows for a user to quickly create high quality 3D maps in a short period of time. To create an image that is more spatially accurate Ground Control Points should have been manually put in and taken of the area then tied to the imagery. Pix4d automatically creats GCP's from the locations on the images but this is not completely accurate. This first look at Pix4d was a great introduction to 3D mapping from UAS data. There is much more to learn about image processing in Pix4d.
Conclusions:
Overall, Pix4d is a very useful tool in importing and processing large amounts of images from a UAS platform. It streamlines the workflow allowing the user more time for analyzing the data to gain contextual insight and less time processing and creating maps and images.
Pix4d is an image processing software that is based on automatically finding thousands of common points between images. When the same common points (keypoints) are found on multiple images the, program generates a 3D point. In order to create highly accurate 3D images, images must maintain high amounts of overlap to create as many 3D points as possible. It is recommended by Pix4d that at least 75% frontal and 60% side overlap is maintained.
Pix4dmapper 3.1 Usermanual
When mapping terrain such as forest and dense vegetation, flat terrain with agriculture fields, and areas of snow and sand a minimum of 85% frontal and 70% side overlap is recommended for quality map construction in Pix4d. In many cases camera settings, such as exposure, must be adjusted to receive quality images. Pix4d can process multiple flights by overlapping images from both flights. Both flights must be taken at a similar altitude. Pix4d can also process oblique images. For the user to get high quality maps from oblique images, the user must take images with their camera at multiple different angles. Pix4d does not require Ground Control points to create accurate georeferenced maps. The program will automatically do this with the coordinates that are tied to the images. It is recommended that GCP's are taken of the study area and put into Pix4d to create the most accurate map possible but is not required. After inputting and processing the images a quality report is created that includes details about the processing such as, summaries, quality checks, calibrations, maps, and information of the data.
How to Use the Software:
To begin processing in Pix4d the user must connect the program to where they want to save and what to call the new project.
The user must then import their images
Once the images are imported into the user must confirm or change, image coordinate system, geolocation and camera settings. Camera setting are important to have right to allow for proper image processing.
In this case the camera shutter model was set to a Global Default and was changed to a Linear Rolling Shutter.
The next step is to confirm the output coordinate system and GCP coordinate system and select the type of processing that needs to be done. In this case we selected for Pix4d to create 3D Maps.
When finished inputting the data the user gets to a screen that allows them to start the processing. The user then sets his processing options and selects to only do the initial process. If the user leaves, Initial Processing, Point Cloud and Mesh, and DMS, Orthomosaic and Index selected it will process all three parts while doing an initial process for each part. This wastes time so it is advised to run the initial process, then run #2 and #3 together.
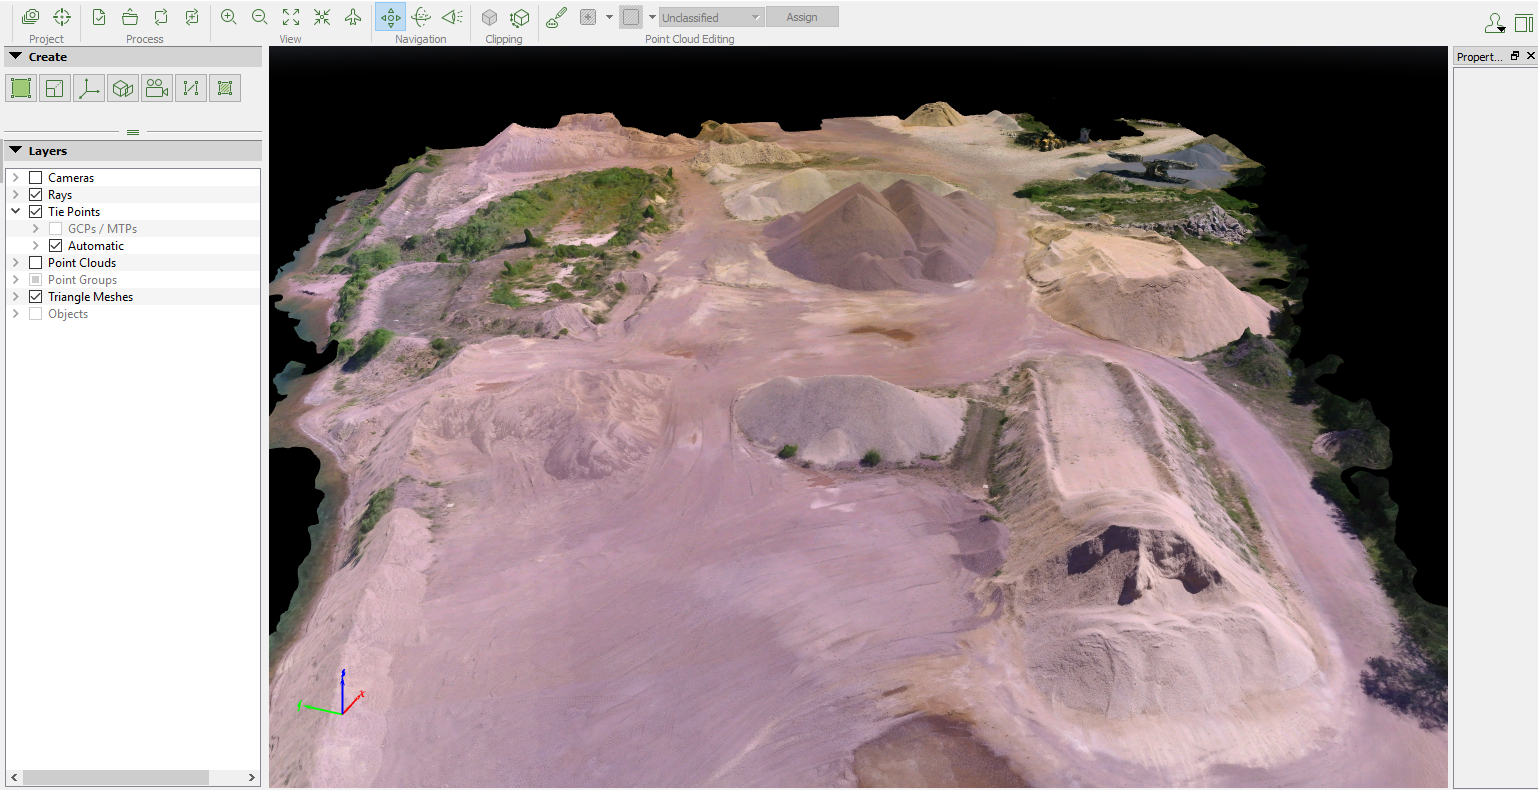
After processing the user will get reports for each process as well as the map. All the user needs to do to view the map is turn cameras off in the layers section and turn on triangle meshes. This will result in a map similar to below.
Maps/Data:
After the processing, Pix4d creates a report with lots of useful information. The first page of the quality reports shows a summary, quality check of processing results, and a preview of the maps that are created.
In the report is a section about overlap. It is important that the images contained a high amount of overlap to create as many keypoints as possible. This will ensure the highest quality 3d image. It can be seen that the bottom row of images have less overlap than anywhere else. This could be due to a gust of wind pushing the UAS slightly off its path during the last sweep.
The .tif files created in Pix4d can be imported into a geodatabase in ArcMap and created into visually appealing maps. The map below is a Digital Surface model and a Mosaicked image of the mine the data was taken from. The map on the left shows the height of different objects in a color scale model and the map on the right shows the visable band image of the area.
A useful tool in Pix4d is creating videos of maps using the in software fly over video recording tool. This allows the user to create visually appealing flyover videos of the area by simply setting way points and rendering the video.
First Impressions of Pix4d:
At first impression this software is easy to use and can be very beneficial for many applications in the UAS world. Taking drone imagery then turning it into a georeferenced 3D map without Pix4d would require extensive knowledge of different programs and algorithms. Pix4d allows for a user to quickly create high quality 3D maps in a short period of time. To create an image that is more spatially accurate Ground Control Points should have been manually put in and taken of the area then tied to the imagery. Pix4d automatically creats GCP's from the locations on the images but this is not completely accurate. This first look at Pix4d was a great introduction to 3D mapping from UAS data. There is much more to learn about image processing in Pix4d.
Conclusions:
Overall, Pix4d is a very useful tool in importing and processing large amounts of images from a UAS platform. It streamlines the workflow allowing the user more time for analyzing the data to gain contextual insight and less time processing and creating maps and images.
Monday, February 20, 2017
Contructing Maps with Processed UAS Data
Introduction
Why are proper cartographic skills essential in working with UAS data?
Being able to make a cartographically pleasing representation of the area of interest is very important. A viewer should be able to look at a map and understand what it is representing and where it is. It should also have important information on where the data came from and when it was gathered.
What are the fundamentals of turning either a drawing or an aerial image into a map?
The data can be imported into a program like ArcMap and put into a geodatabase.
What can spatial patterns of data tell the reader about UAS data? Provide several examples.
Spatial patterns can tell the reader a number of things, for example, if looking at UAS data of a crop field and the crops in one area of the field are yielding less growth and production, that could mean the soil is not as good there or less water is getting to that area. Having a birds eye view of the area of interest gives the opportunity to discover patterns that are not so easily recognizable from the ground.
What are the objectives of the lab?
The objective of this lab is to create a map that demonstrates good map building fundamentals and data management.
Methods
To create a map the first thing that needs to be done is bringing the data into a program that can work with it. An orthomosaic and a Digital Surface Model (DSM) were brought into ArcMap of the outdoor track on the UW-Eau Claire campus taken from a DJI Phantom drone at 50m. These files were then turned into functioning maps, three maps were created. The first map is an orthomosaiked image map to show what the area looks like from above in standard RBG imagery. An orthorectified mosaic (orthomosaic) is an image that is actually tied to the coordinate system, This is constant throughout the image and eliminates distortion . A georeferenced mosaic is similar to an orthorectified mosaic but it is not actually tied to the coordinate system, it is juist dies down by reference points and can still be distorted. Many people publish georectified images to be orthorectified when that is not true. The second map is a Digital Surface Model that shows the elevation changes of the track and the surrounding area. A Digital Elevation Model shows the elevation of the ground level, this comes from the last returns of the data. A Digital Surface Model shows the elevation with trees and other objects that are not the surface of the terrain. The third map is a hill shade model shows the shadows of the DSM, this is exaggerated and hows elevation even more. This was done in ArcScene by giving the DSM vertical exaggeration.
http://resources.arcgis.com/en/help/main/10.2/index.html#/Fundamentals_of_georeferencing_a_raster_dataset/009t000000mn000000/
Why are proper cartographic skills essential in working with UAS data?
Being able to make a cartographically pleasing representation of the area of interest is very important. A viewer should be able to look at a map and understand what it is representing and where it is. It should also have important information on where the data came from and when it was gathered.
What are the fundamentals of turning either a drawing or an aerial image into a map?
The data can be imported into a program like ArcMap and put into a geodatabase.
What can spatial patterns of data tell the reader about UAS data? Provide several examples.
Spatial patterns can tell the reader a number of things, for example, if looking at UAS data of a crop field and the crops in one area of the field are yielding less growth and production, that could mean the soil is not as good there or less water is getting to that area. Having a birds eye view of the area of interest gives the opportunity to discover patterns that are not so easily recognizable from the ground.
What are the objectives of the lab?
The objective of this lab is to create a map that demonstrates good map building fundamentals and data management.
Methods
To create a map the first thing that needs to be done is bringing the data into a program that can work with it. An orthomosaic and a Digital Surface Model (DSM) were brought into ArcMap of the outdoor track on the UW-Eau Claire campus taken from a DJI Phantom drone at 50m. These files were then turned into functioning maps, three maps were created. The first map is an orthomosaiked image map to show what the area looks like from above in standard RBG imagery. An orthorectified mosaic (orthomosaic) is an image that is actually tied to the coordinate system, This is constant throughout the image and eliminates distortion . A georeferenced mosaic is similar to an orthorectified mosaic but it is not actually tied to the coordinate system, it is juist dies down by reference points and can still be distorted. Many people publish georectified images to be orthorectified when that is not true. The second map is a Digital Surface Model that shows the elevation changes of the track and the surrounding area. A Digital Elevation Model shows the elevation of the ground level, this comes from the last returns of the data. A Digital Surface Model shows the elevation with trees and other objects that are not the surface of the terrain. The third map is a hill shade model shows the shadows of the DSM, this is exaggerated and hows elevation even more. This was done in ArcScene by giving the DSM vertical exaggeration.
Figure 1: Orthomosaic Map of Sports Track
Figure 2: DSM
Figure 3: Hillshade Relief Map
Results
The orthomosaic (figure 1) gives a good idea of what the area of interest looks like but in order to understand in more depth of the area of interest other maps and models were created. To understand elevation in the AOI, a DSM was created (figure 2). The DSM shows that from the southwest portion of the map to the northeast portion, the elevation slowly increases. This aligns with the statistics from the DSM descriptive stats by staying in the proper range from 17-23. Using the DSM and the orthomosaic, more can be understood about the AOI. To understand even further, the hillshade map shows that there are buildings, trees and other vegetation surrounding the map. This also explains some of the descriptive statistics.
Conclusion
UAS data is very useful as a tool to a cartographer and a GIS user because it enables the user to get high quality data from a specific area of interest in a short amount of time and for little cost. Getting centimeter level accuracy from a satellite image would be nearly impossible and very expensive. The limitations of this data is that it comes with a lot of extra data that needs to be cut out. The user needs to know how to do various tasks to get the data into a form that is useful. UAS data could be combined with other data to make it extremely useful. In this situation, rainfall and water run off analysis could be done with the additional elevation, soil type, and other information.
References
http://resources.arcgis.com/en/help/main/10.2/index.html#/Fundamentals_of_orthorectifying_a_raster_dataset/009t000000ms000000/
http://resources.arcgis.com/en/help/main/10.2/index.html#/Fundamentals_of_georeferencing_a_raster_dataset/009t000000mn000000/
Monday, February 6, 2017
Unmanned Aerial Systems: Platform Consulting Report
Hobby/Low Lever Commercial Drone: DJI Mavic Pro
Price: $999.00
Max Range: 4.3 Miles
Max Flight Time: 27 Minutes
Weight: 743 Grams
OcuSync Video liveview
Link: http://store.dji.com/product/mavic-pro#/?_k=x0vnvp
When buying a lower lever professional drone it is normally for the purpose of videography. DJI is one of the leading makers of drones for this purpose. The Mavic is a newer model that has many components that help a newer pilot safely fly and get quality video. Being lighter and more compact that comparable drones, the Mavic is easily transportable without the fear of breaking. The four arms fold into the body and make it almost small enough to fit in a pocket.
The 4k camera has a 3-axis gimble that allows for physical stabilization of the camera. The camera is so stable it allows for eight second exposure shots. This camera has a longer focal length than DJI phantom cameras which creates a more narrow field of view in the video. A narrower field of view allows for more depth to be recognized in the image. The camera also has a tap-to-focus technology meaning that the user can tap the image on their phone screen on the remote and the camera will focus on whatever the user taps.
The controller is also small and portable but does not lack features and quality. It has a built in spot for a smartphone that can be linked to the drone with DJI's application. It has a new OcuSync program that allows for better connection from the phone on the controller to the video on the drone. OcuSync is more relieable and less glitchy than the LightBridge on the Phantom series. The Mavic has an easy land feature that lands the drone by using sensors on the bottom the device to detect when it's close to the ground then automatically setting itself down. The Mavic also comes with a number of smart features that control the device in flight. It has features that can follow the user behind, in front or on the side, and track the user in a single spot, side to side.
The Mavic Pro is a good choice for a low end drone because it has all the features that the user will need to take quality images and video and a lower level scale. It has a camera that can get the job done and comes with many features that makes it easy to fly. This is a great drone for the price from a reliable company and would make for a good entry level drone.
Mid-Level Commercial: DJI Matrice 600 Pro
Price: $4999.00
Gimbal: Ronin-MX $1599.00
GPS: Upgraded A3 D-RTK $4599.00
Total: $11,500 + Camera
Camera: User's Choice
Flight Time: 38 Minutes no payload, 16 Minutes with 13lb payload
Range: 3.1 Miles
Weight: 22 lbs
Link: http://store.dji.com/product/matrice-600-pro?from=menu_products#/?_k=7fz06w
The DJI Matrice 600 Pro (M600) is a Professional level commercial drone that is aimed towards high level videography and professional surveying. This drone paired with a Ronin-MX gimbal allows for the user to fit almost any DSLR camera of their choice to the unit. The M600 with a Ronin-MX gimbal uses DJI Lightbridge 2 video transmission to have complete control of the camera from the remote. The M600 comes almost ready to fly with little to no putting parts together yourself. The landing gear is retractable to be folded up once in flight.
The M600 Professional model comes equip with three sets of GNSS units which provides GPS accuracy up to 1.5 meters horizontally. With the upgraded D-RTK GPS, it takes the horizontal accuracy from 1.5 meters, to within one centimeter and withstand magnetic interference. This makes this unit perfect for industrial use.. The M600 comes with six separate batteries that give the device up to a half hour of flight time under load. A six hub charger is included in the package making charging times shorter and more flights possible.
The M600 can fly up to 40 MPH and up to 8,202 feet above sea level. It has a maximum ascent speed of 5 m/s and descent speed of 3 m/s. It has a multitude of built in advanced flight features:
-Ready-To-Fly
-Altitude Hold
-Positional Hold
-Follow Me Capability
-Automatic Landing
-Return To Home
The M600 comes with a controller that has a smart phone or tablet mount built on it. This allows the user to use the DJI GO app and DJI Assistant 2. This gives the user a life HD view, battery status, redundancy status, transmission strength, and much more. This is also the control center for the the camera, allowing the user to control the shutter speed, photo or video capture, ISO, and many other options. Buying a DJI product means the user will be getting great costumer service from a reliable company. DJI Go has a mission planner software built into it. This allows the user to set waypoints before the flight and the drone will autopilot to these points. This can be done on the go or on the computer before the user is in the field.
The DJI Matrice 600 pro equipped with a Ronin-MX gimbal and a D-RTK GPS system makes is a perfect drone from taking high accuracy data in a commercial setting. This combination will run up to around $15,000 but the level of accuracy that can be obtained from this unit would create many opportunities for the user.
High Level Commercial Drone: Trimble UX5 HP
Price: Around $50,000
Weight: 5.5 lb
Wing Span: 40 in
Range:3.1 Miles
Max Flight Height: 16,400 ft
Flight Time: 35 minutes
Link: http://uas.trimble.com/ux5-hp
This high precision drone come equipped with a high precision GNSS reciever and a Sony a7R camera. This camera is capable of 36 megapixel resolution. The GNSS reciever allows for 1-cm accuracy and allows for 1000 points per square meter for 3D models. This platform comes with the flexibility of choosing between a Near Infrared, or RBG sensor system and a number of different lenses.
This platform uses the Trimble Access Aerial Imaging that can be loaded onto the Trimble Tablet Rugged PC that allows for mission planning, pre-flight checks, and monitoring flights.
This is a great product for a user seeking to get high end data of large areas that is easily compatible with software for easy manipulation. This UAS platform can be flown in winds up to 55km/h and in varying weather conditions. This platform uses industry leading GPS and software that will provide solid data for many applications
Sources:
http://www.trimble.com/Survey/UX5-HP.aspx?tab=System_Comparison
http://uas.trimble.com/ux5-hp
http://store.dji.com/product/matrice-600-pro?from=menu_products#/?_k=7fz06w
http://store.dji.com/product/mavic-pro#/?_k=x0vnvp
http://drones.specout.com/
Price: $999.00
Max Range: 4.3 Miles
Max Flight Time: 27 Minutes
Weight: 743 Grams
OcuSync Video liveview
Link: http://store.dji.com/product/mavic-pro#/?_k=x0vnvp
When buying a lower lever professional drone it is normally for the purpose of videography. DJI is one of the leading makers of drones for this purpose. The Mavic is a newer model that has many components that help a newer pilot safely fly and get quality video. Being lighter and more compact that comparable drones, the Mavic is easily transportable without the fear of breaking. The four arms fold into the body and make it almost small enough to fit in a pocket.
The 4k camera has a 3-axis gimble that allows for physical stabilization of the camera. The camera is so stable it allows for eight second exposure shots. This camera has a longer focal length than DJI phantom cameras which creates a more narrow field of view in the video. A narrower field of view allows for more depth to be recognized in the image. The camera also has a tap-to-focus technology meaning that the user can tap the image on their phone screen on the remote and the camera will focus on whatever the user taps.
The controller is also small and portable but does not lack features and quality. It has a built in spot for a smartphone that can be linked to the drone with DJI's application. It has a new OcuSync program that allows for better connection from the phone on the controller to the video on the drone. OcuSync is more relieable and less glitchy than the LightBridge on the Phantom series. The Mavic has an easy land feature that lands the drone by using sensors on the bottom the device to detect when it's close to the ground then automatically setting itself down. The Mavic also comes with a number of smart features that control the device in flight. It has features that can follow the user behind, in front or on the side, and track the user in a single spot, side to side.
The Mavic Pro is a good choice for a low end drone because it has all the features that the user will need to take quality images and video and a lower level scale. It has a camera that can get the job done and comes with many features that makes it easy to fly. This is a great drone for the price from a reliable company and would make for a good entry level drone.
Mid-Level Commercial: DJI Matrice 600 Pro
Price: $4999.00
Gimbal: Ronin-MX $1599.00
GPS: Upgraded A3 D-RTK $4599.00
Total: $11,500 + Camera
Camera: User's Choice
Flight Time: 38 Minutes no payload, 16 Minutes with 13lb payload
Range: 3.1 Miles
Weight: 22 lbs
Link: http://store.dji.com/product/matrice-600-pro?from=menu_products#/?_k=7fz06w
The DJI Matrice 600 Pro (M600) is a Professional level commercial drone that is aimed towards high level videography and professional surveying. This drone paired with a Ronin-MX gimbal allows for the user to fit almost any DSLR camera of their choice to the unit. The M600 with a Ronin-MX gimbal uses DJI Lightbridge 2 video transmission to have complete control of the camera from the remote. The M600 comes almost ready to fly with little to no putting parts together yourself. The landing gear is retractable to be folded up once in flight.
The M600 Professional model comes equip with three sets of GNSS units which provides GPS accuracy up to 1.5 meters horizontally. With the upgraded D-RTK GPS, it takes the horizontal accuracy from 1.5 meters, to within one centimeter and withstand magnetic interference. This makes this unit perfect for industrial use.. The M600 comes with six separate batteries that give the device up to a half hour of flight time under load. A six hub charger is included in the package making charging times shorter and more flights possible.
The M600 can fly up to 40 MPH and up to 8,202 feet above sea level. It has a maximum ascent speed of 5 m/s and descent speed of 3 m/s. It has a multitude of built in advanced flight features:
-Ready-To-Fly
-Altitude Hold
-Positional Hold
-Follow Me Capability
-Automatic Landing
-Return To Home
The M600 comes with a controller that has a smart phone or tablet mount built on it. This allows the user to use the DJI GO app and DJI Assistant 2. This gives the user a life HD view, battery status, redundancy status, transmission strength, and much more. This is also the control center for the the camera, allowing the user to control the shutter speed, photo or video capture, ISO, and many other options. Buying a DJI product means the user will be getting great costumer service from a reliable company. DJI Go has a mission planner software built into it. This allows the user to set waypoints before the flight and the drone will autopilot to these points. This can be done on the go or on the computer before the user is in the field.
The DJI Matrice 600 pro equipped with a Ronin-MX gimbal and a D-RTK GPS system makes is a perfect drone from taking high accuracy data in a commercial setting. This combination will run up to around $15,000 but the level of accuracy that can be obtained from this unit would create many opportunities for the user.
High Level Commercial Drone: Trimble UX5 HP
Weight: 5.5 lb
Wing Span: 40 in
Range:3.1 Miles
Max Flight Height: 16,400 ft
Flight Time: 35 minutes
Link: http://uas.trimble.com/ux5-hp
This high precision drone come equipped with a high precision GNSS reciever and a Sony a7R camera. This camera is capable of 36 megapixel resolution. The GNSS reciever allows for 1-cm accuracy and allows for 1000 points per square meter for 3D models. This platform comes with the flexibility of choosing between a Near Infrared, or RBG sensor system and a number of different lenses.
This platform uses the Trimble Access Aerial Imaging that can be loaded onto the Trimble Tablet Rugged PC that allows for mission planning, pre-flight checks, and monitoring flights.
This is a great product for a user seeking to get high end data of large areas that is easily compatible with software for easy manipulation. This UAS platform can be flown in winds up to 55km/h and in varying weather conditions. This platform uses industry leading GPS and software that will provide solid data for many applications
Sources:
http://www.trimble.com/Survey/UX5-HP.aspx?tab=System_Comparison
http://uas.trimble.com/ux5-hp
http://store.dji.com/product/matrice-600-pro?from=menu_products#/?_k=7fz06w
http://store.dji.com/product/mavic-pro#/?_k=x0vnvp
http://drones.specout.com/
Subscribe to:
Posts (Atom)